Dahua FTP Setup for Timelapse: Connect Your Camera to TimelapseRobot
Set up a Dahua IP camera for timelapse: one photo every 10 minutes, uploaded to TimelapseRobot by FTP. From a brand-new camera to the first photo, with fixes for the usual problems.
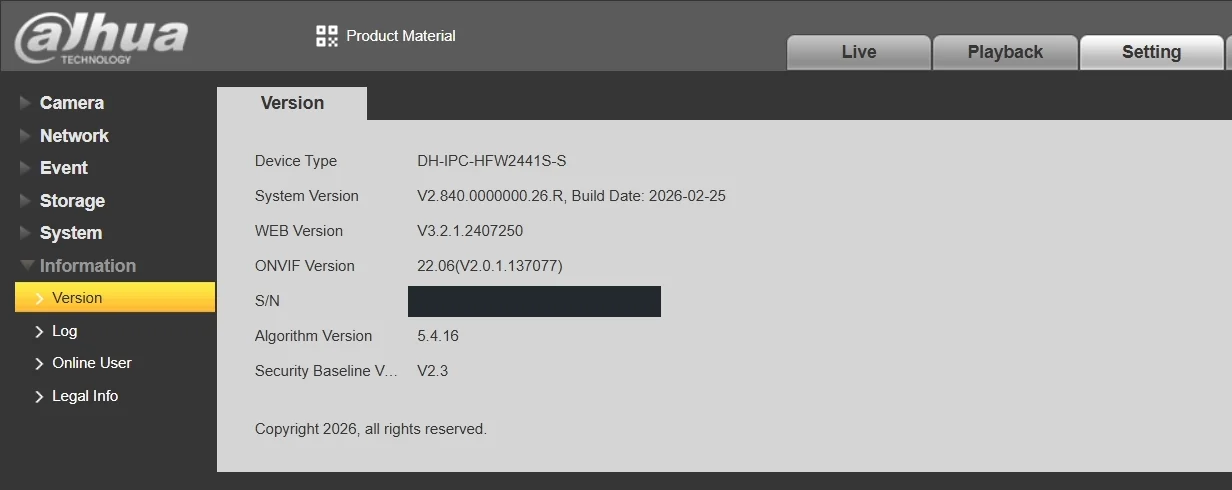
A Dahua IP camera takes a photo on a fixed schedule and uploads it to TimelapseRobot by FTP. This guide shows the full setup, from a brand-new camera to the first photo in your account. Tested with a Dahua DH-IPC-HFW2441S-S (firmware V2.840.0000000.26.R, web interface V3.2.1) and Dahua ConfigTool 5.1.6.2 on Windows in November 2026.
The guide follows Dahua's Web 3.0 interface, which is in English by default. With other interface versions, the menus may look different. Prefer a checklist you can tick off step by step? Open the interactive Dahua quick start. Its steps 1 to 7 match steps 4 to 10 here.
Before you start: the camera needs power (its 12 V power supply or PoE) and a network cable to the same local network as your computer. You also need a computer with a web browser. We tested with Chrome, Edge and Firefox.
1. Create the FTP camera in TimelapseRobot#
- Log in at my.timelapserobot.com.
- Create a new project or open an existing one and click Add Camera.
- Select FTP Camera, give it a name and choose your plan. The Free plan is enough to start: TLR-Cloud is free for every camera, with 2 GB of storage per camera.
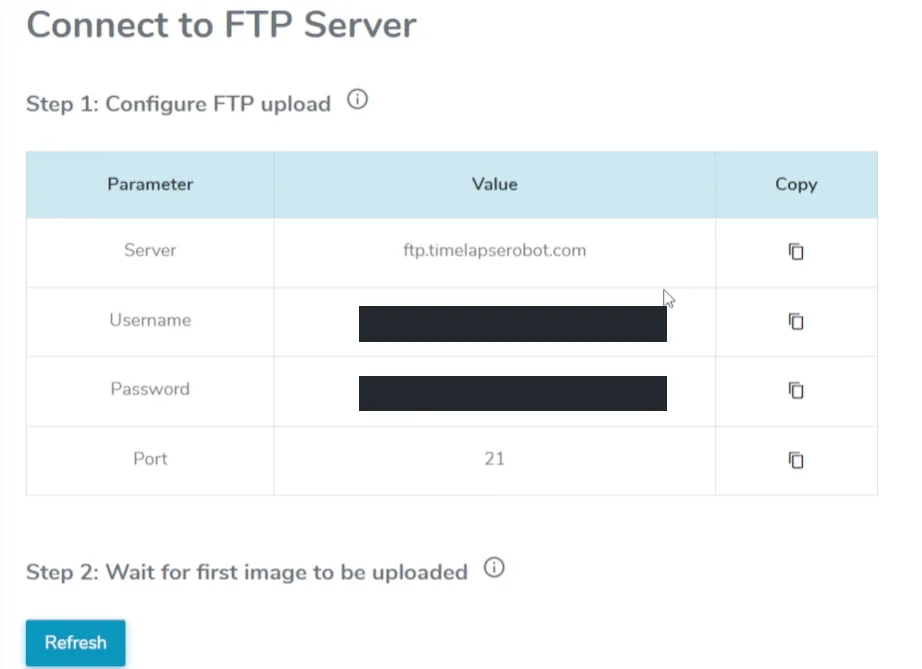
- TimelapseRobot shows Step 1: Configure FTP upload with four values: Server
ftp.timelapserobot.com, Username and Password (both unique to this camera) and Port21. Keep this window open.
2. New camera only: find it and set a password#
Is your camera already on your network, and can you log in? Then skip to step 3.
A new Dahua camera has no password and the fixed address 192.168.1.108, which your network usually cannot reach. Dahua's ConfigTool fixes both. Download it from the Dahua website and install it. We tested it on Windows.
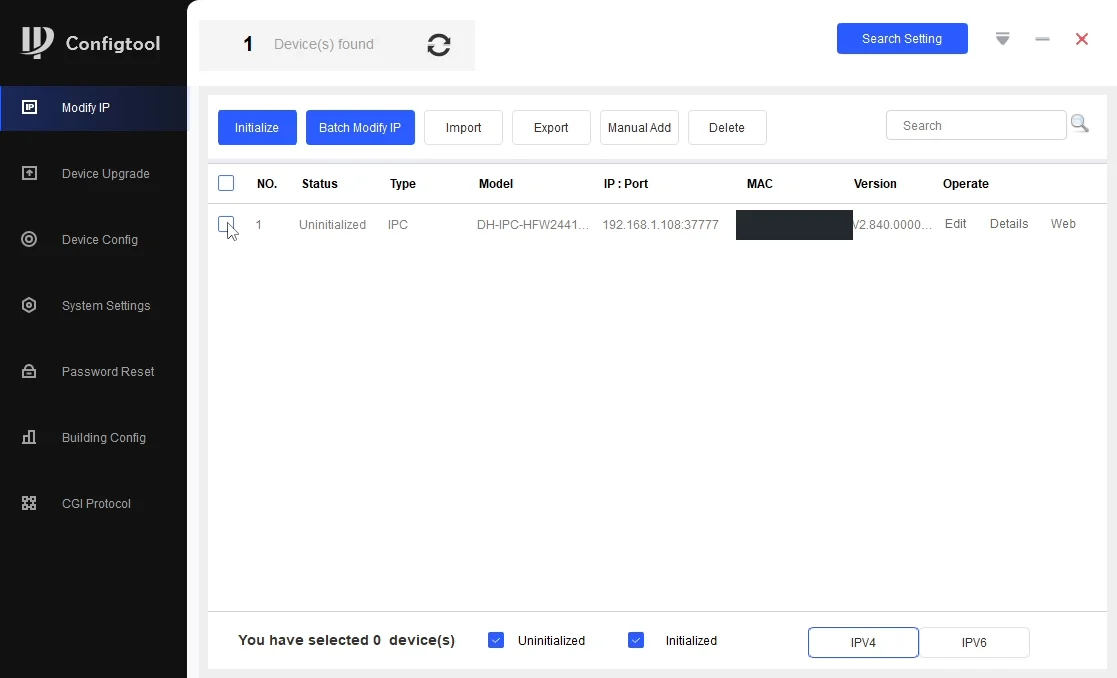
- Open ConfigTool. Your camera appears in the list with the status Uninitialized.
- Select the camera and click Initialize. Set a strong admin password and write it down.
- The next page offers Easy4ip and Auto-check for updates. Neither is needed for TimelapseRobot. Click OK, then Finish. The status is now Initialized.
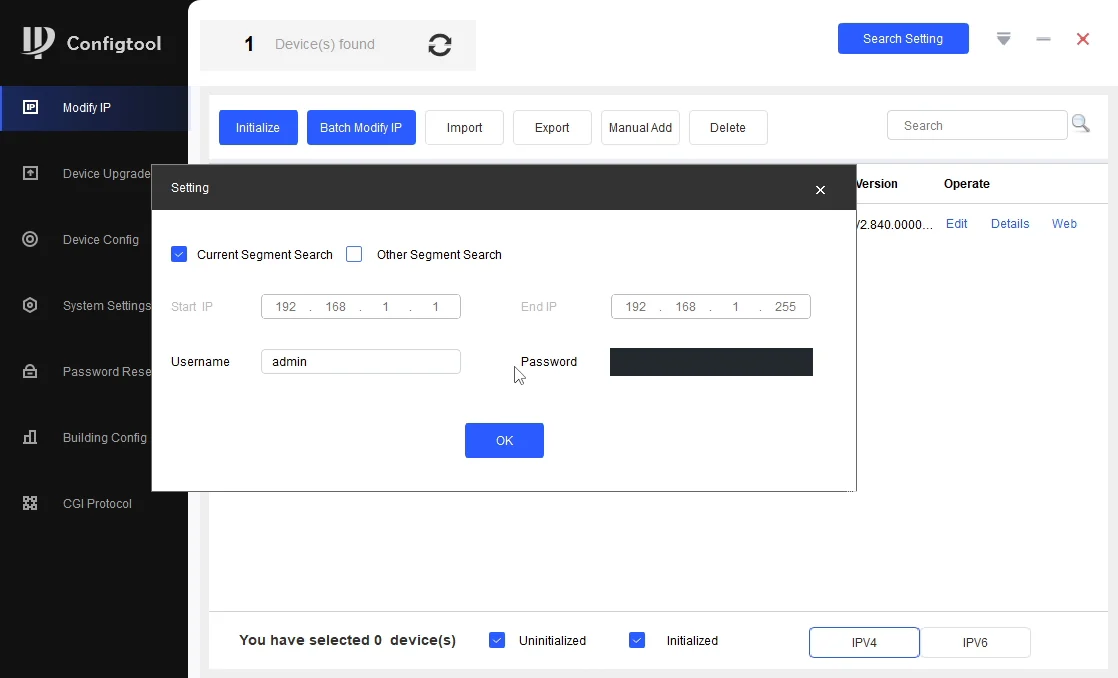
- Click Search Setting at the top right. Under Password, enter the password you just set and click OK. The username stays
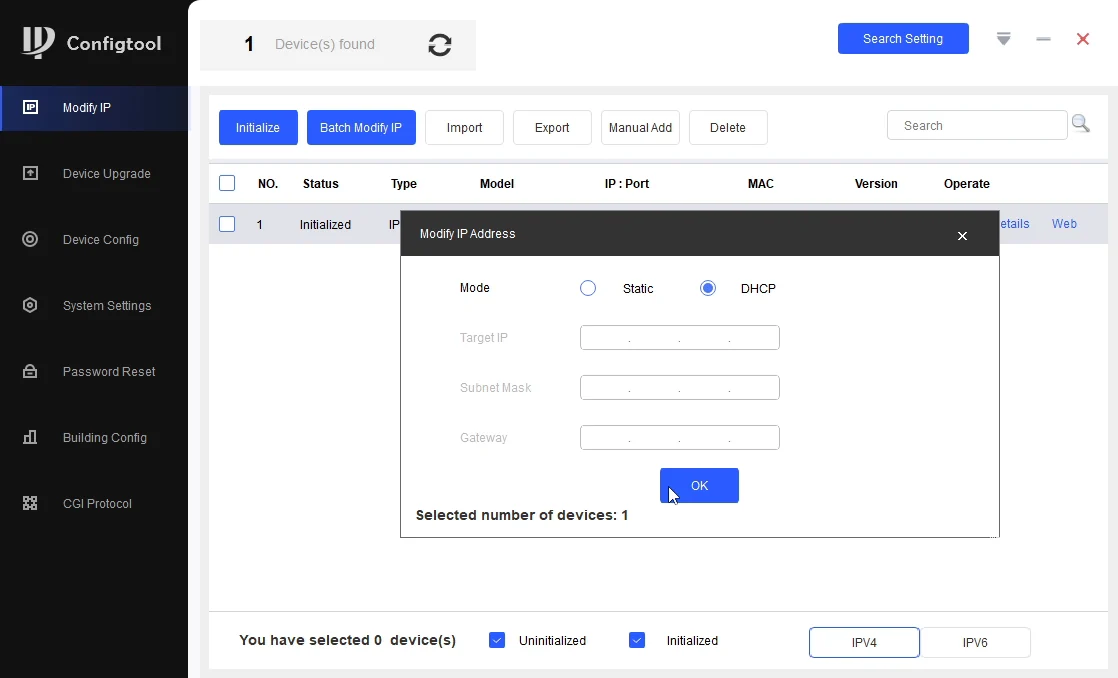
admin. - Click Edit in the camera's row. In the Modify IP Address window, set Mode to DHCP and click OK.
- Unplug the camera's power for a few seconds and plug it back in.
- After about a minute, refresh the list. The camera now has an address from your network.
- Click Web in the camera's row. The login page opens. Log in with the username
adminand your password.
Verified in testing: without the power cycle in item 6, the camera fell back to its old address after a few minutes. Only the restart gave it a stable address.
3. Log in and check the interface version#
If you are not logged in yet, type the camera's IP address into your browser's address bar and log in. Then open Setting → Information → Version. This guide applies if the WEB Version starts with V3.
4. Set the camera clock#
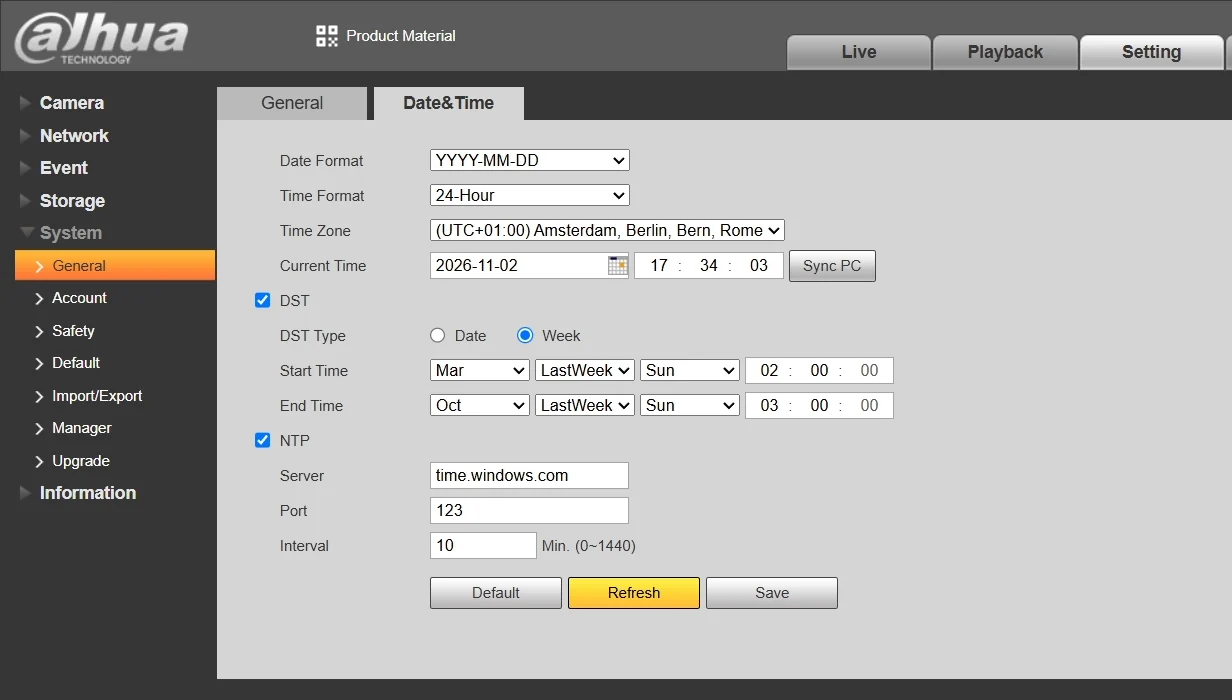
TimelapseRobot files every image by its capture time, so the clock has to be right. Go to Setting → System → General → Date&Time and set:
- Time Zone: your time zone. For Central Europe, choose
(UTC+01:00) Amsterdam, Berlin, Bern, Rome, Stockholm, Vienna. - DST: on if your region uses daylight saving time. Set DST Type to Week. For Central Europe: Start Time Mar, LastWeek, Sun, 02:00:00 and End Time Oct, LastWeek, Sun, 03:00:00.
- NTP: on. Keep the preset server and port.
Click Save. When the camera asks about NTP, click OK. Then click Refresh and check that the time zone and the time are correct.
5. Take a photo every 10 minutes#
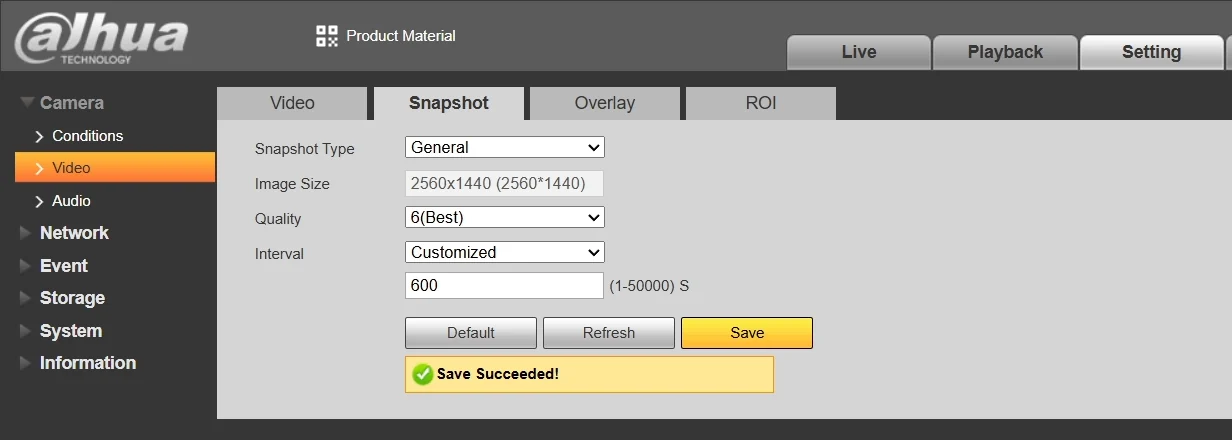
Go to Setting → Camera → Video → Snapshot and set:
- Snapshot Type: General
- Quality: 6(Best)
- Interval: Customized, then
600(seconds)
Click Save.
6. Let the camera take photos around the clock#
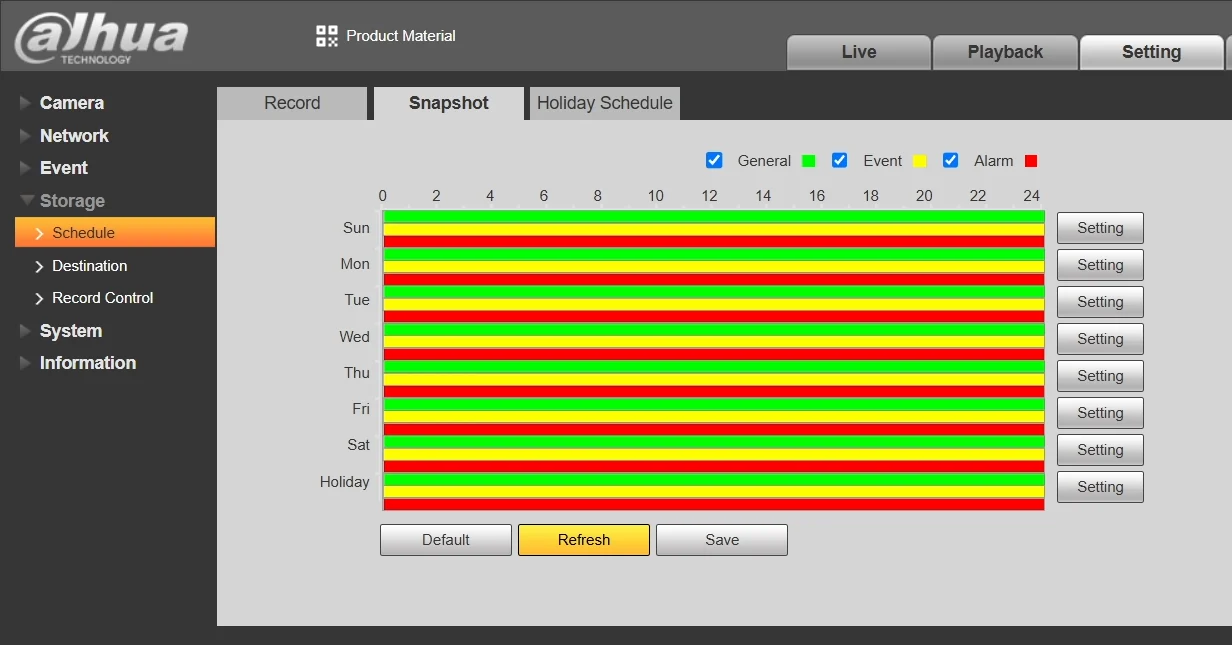
Go to Setting → Storage → Schedule → Snapshot.
- Click Setting in any row.
- Tick All.
- In Period1 (00:00:00 to 23:59:59), tick General.
- Click Save in the window, then Save on the page.
Every day must show a green bar from 0 to 24. Click Refresh to check that the setting was saved. Without General, the camera takes no timed photos.
7. Switch off motion detection#
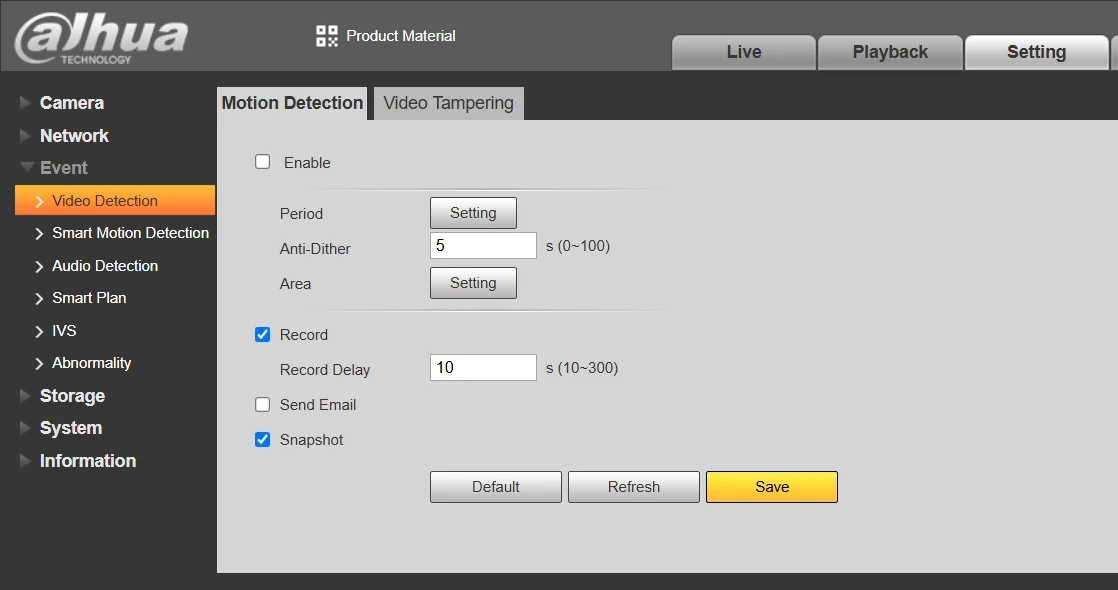
Go to Setting → Event → Video Detection → Motion Detection, untick Enable and click Save. Otherwise a person in front of the camera triggers extra photos, and the camera uploads those as well. Smart Motion Detection turns off along with it.
8. Send the timed photos to FTP#
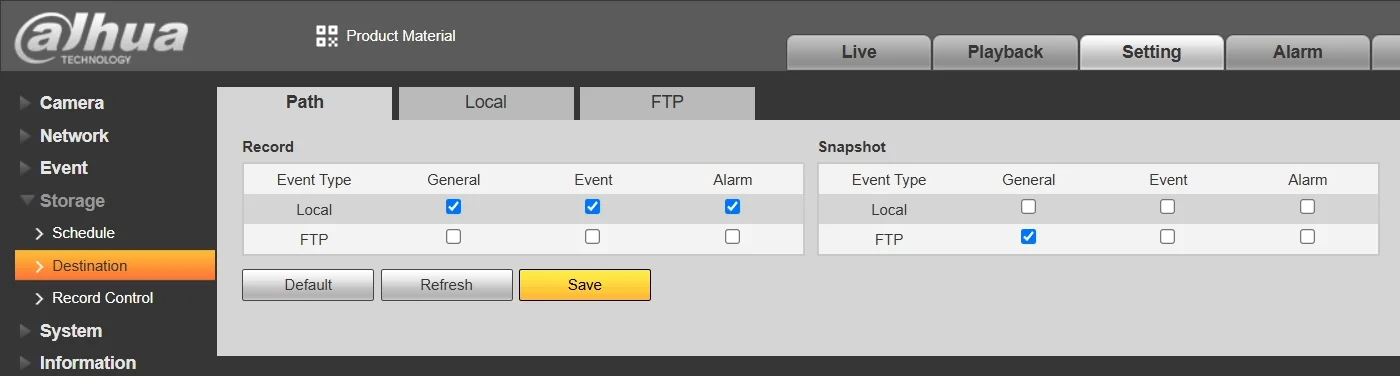
Go to Setting → Storage → Destination → Path. In the Snapshot table, tick only FTP in the General column. Leave every other box in this table unticked. Click Save, then Refresh, and check the ticks.
9. Enter the FTP details#
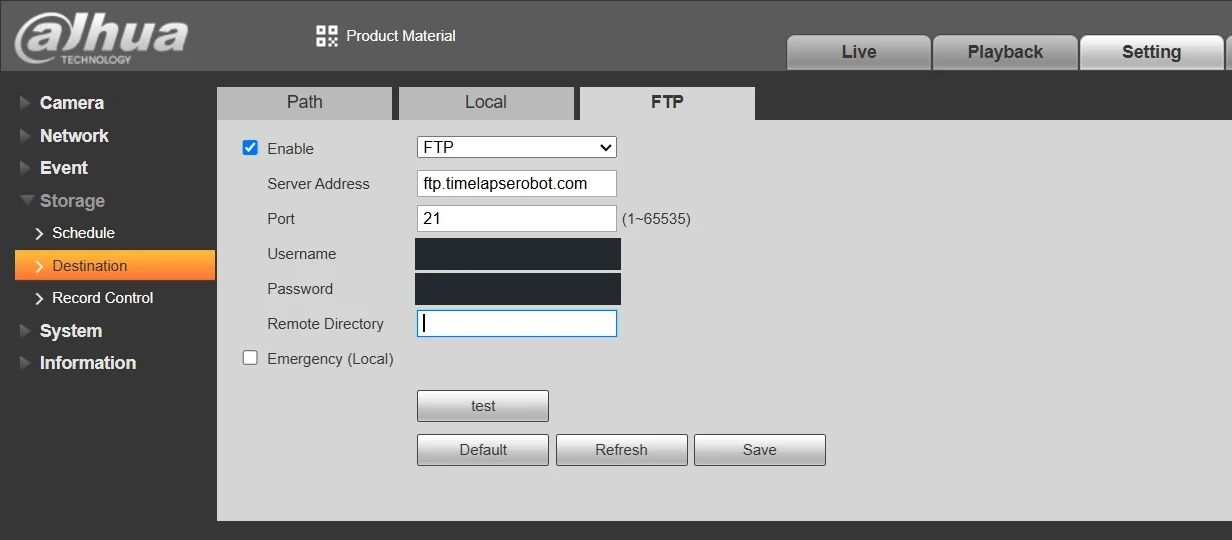
Go to Setting → Storage → Destination → FTP and fill in:
- Enable: on
- Type (the drop-down menu without a label, next to Enable): FTP, not SFTP(Recommended). The port changes to 21.
- Server Address:
ftp.timelapserobot.com - Port:
21 - Username: your FTP username from TimelapseRobot
- Remote Directory: leave empty. Delete the preset value
share. - Password: your FTP password from TimelapseRobot. Fill in this field last. Type it by hand, then click Save right away. Pasting the password does not work.
Do not rely on the test button on this page. It may report FTP server test failure, file deletion right loss. That does not mean the connection failed: TimelapseRobot does not allow the camera to delete files. The real proof is the first photo in TimelapseRobot.
10. Check the first photo in TimelapseRobot#
Within 10 minutes, the first photo appears in TimelapseRobot. TimelapseRobot reads the date and time from the camera's default file names, so there is nothing to change on the camera.
Open your camera in TimelapseRobot, set Detected Timezone to your own time zone, for example Europe/Vienna, and save. The automatic guess may pick a zone without daylight saving time, and summer photos would then be one hour off.
Tip: out of the box, the camera burns the date and the camera name into every photo. For photos without them, open Setting → Camera → Video → Overlay and set Channel Title and Time Title to Disable. Click Save after each one.
If something does not work#
- No photos arrive. The most common cause is the FTP password: it was pasted instead of typed, or not saved right away. Other possible causes: the FTP details are wrong, SFTP is selected, General is missing in the schedule, or FTP is not ticked under Path. Check steps 6, 8 and 9. Type the FTP password by hand and click Save right away.
- Extra photos at odd times. Motion detection is still on. Repeat step 7.
- Photos are one hour off. The time zone or daylight saving time is wrong in the camera or in TimelapseRobot. Check step 4 and the time zone in TimelapseRobot (step 10).
More on FTP cameras#
Why an FTP camera beats the built-in timelapse mode, and what TLR-Cloud does with the images: IP camera timelapse software and our guide on turning an IP camera into a construction timelapse system. If you have a different camera, follow the Hikvision setup guide or the Reolink setup guide, or look up your brand in the list of supported cameras.
Get started
Ready to capture your construction project in timelapse?
Get the complete weatherproof kit — or start free with your own FTP/IP camera.