Hikvision Timelapse via FTP: Connect Your Camera to TimelapseRobot
Set up a Hikvision IP camera as a construction timelapse camera: timed snapshots, FTP upload to TimelapseRobot, offline buffering on the microSD card – tested, with the five traps that stop images from arriving.
A Hikvision IP camera takes a photo on a fixed schedule and uploads it to TimelapseRobot by FTP. If the connection drops, it buffers the images on its microSD card and catches up later – at the original capture time. This guide condenses a fully tested setup (Hikvision DS-2CD2687G2HT-LIZS, firmware V5.7.14 build 231028, September 2026) into the steps that matter. Menu names follow the English web interface; the German names are in the full manual.
Before you start: the camera needs continuous power (12 V or PoE), a network cable to a router or LTE gateway – this model has no Wi-Fi – and, for buffering, a microSD card. Have the camera's IP address and admin login ready.
1. Create the FTP camera in TimelapseRobot#
- Log in at my.timelapserobot.com.
- Create a new project or open an existing one and click Add Camera.
- Select FTP Camera, give it a name and choose your plan – the Free plan is enough to connect and monitor a camera.
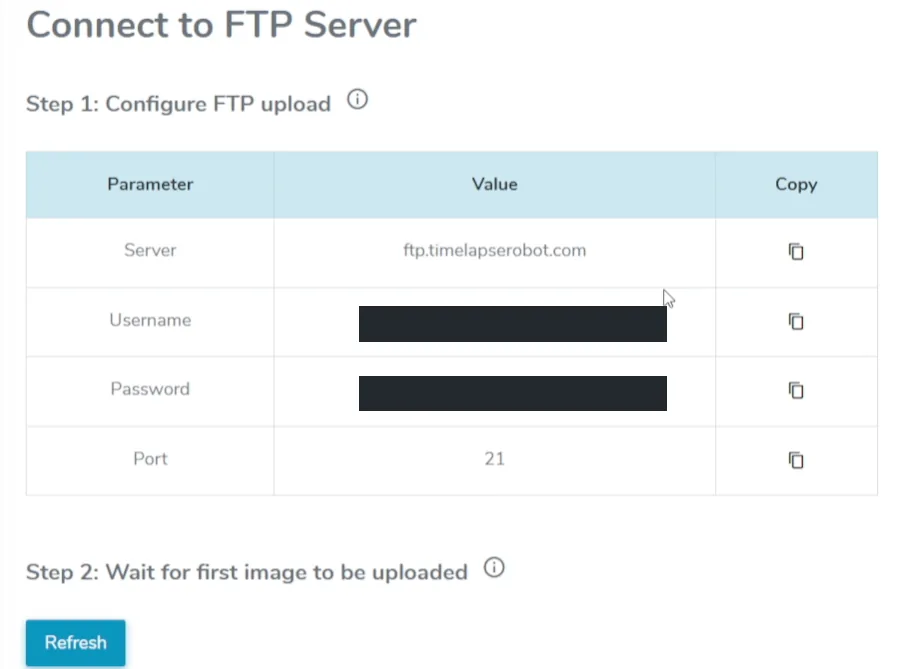
- TimelapseRobot shows Step 1: Configure FTP upload with four values: Server `ftp.timelapserobot.com`, Username and Password (both unique to this camera) and Port `21`. Keep this window open.
2. Set the camera clock first#
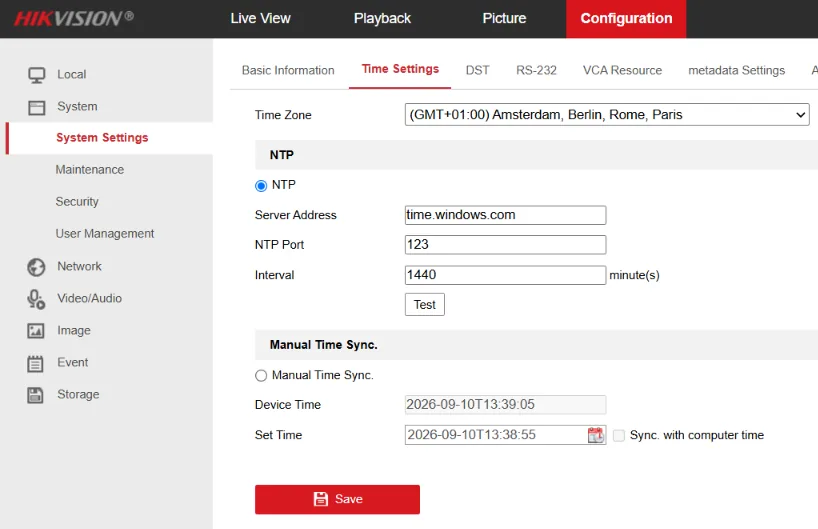
TimelapseRobot files every image by its capture time, so a wrong clock produces a timelapse that jumps – and you only notice weeks later. Go to Configuration → System → System Settings → Time Settings: choose your time zone, enable NTP (server e.g. `time.windows.com`, port `123`, interval `1440` minutes) and save.
Then open the DST tab and set daylight saving time for your region – for Central Europe: start last Sunday in March 02:00, end last Sunday in October 03:00, DST bias 60 minutes. Check the bias field: it is a drop-down and does not default to 60. With 30 minutes your camera runs half an hour wrong all summer.
3. Enter the FTP settings in the Hikvision web interface#
Go to Configuration → Network → Advanced Settings → FTP and fill in:
- FTP Protocol: FTP
- Server Address: `ftp.timelapserobot.com` – the `ftp.` part is mandatory. Plain `timelapserobot.com` is accepted by the field, even gets a green tick, and nothing arrives.
- Port: `21`
- User Name / Password / Confirm: the values from TimelapseRobot
- Anonymous: off
- Directory Structure: *Save in the root directory* – TimelapseRobot identifies the camera by its login
- Picture Filing Interval: OFF
- Picture Name: Default – the filename carries the capture time, which TimelapseRobot reads
- Tick Upload Picture
- Tick Enable Automatic Network Replenishment – off by default. Without it, images buffered during an outage stay on the card and are never uploaded.
Click Save.
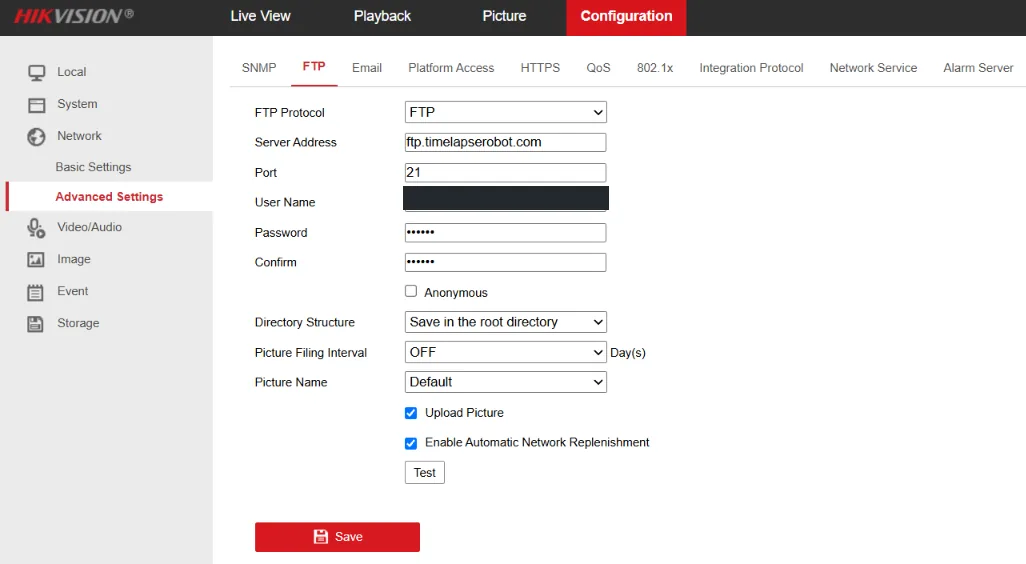
Do not rely on the Test button on this page. In the tested setup it reported a write-permission warning while the real upload worked perfectly. The only valid check is a scheduled image appearing in TimelapseRobot (step 5).
4. Enable timed snapshots and the capture schedule#
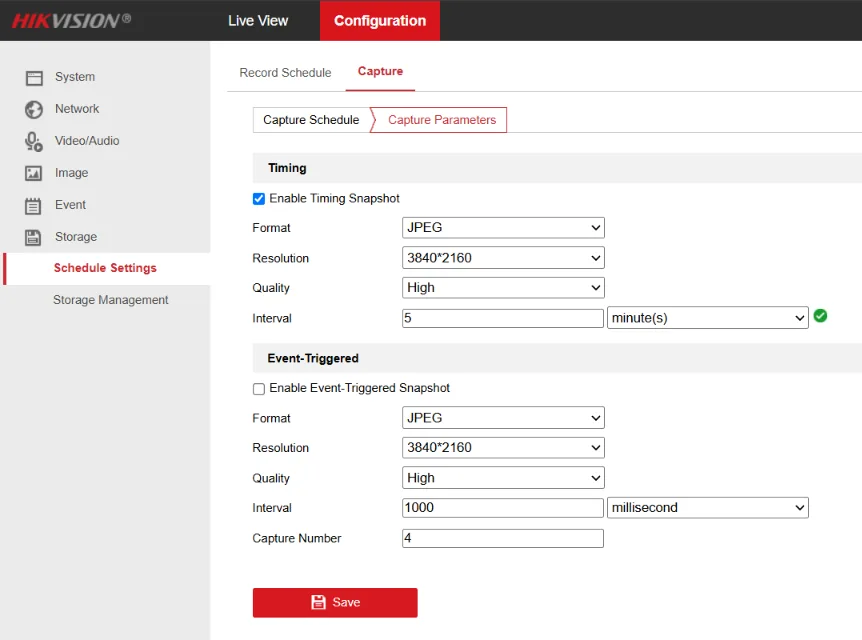
Go to Configuration → Storage → Schedule Settings → Capture. Two tabs sit next to each other: Record Schedule controls video recording, Capture produces the still images – use Capture.
Capture Parameters: in the Timing section tick Enable Timing Snapshot, set Format JPEG, Resolution to the highest available (3840×2160 on this model – TimelapseRobot accepts full-size images), Quality to the highest level, and the Interval. Watch the unit next to the number: ten minutes is `10` with *Minute(s)* or `600` with *Seconds*. The page has a second section, Event-Triggered – leave it disabled.
Capture Schedule: choose Continuous and draw the active times for every day you want to cover. Click and drag across a day's row to create a blue bar, then click the bar to type the exact start and end – for a continuous timelapse 00:00–24:00 on all seven days. The bars must show blue. Save.
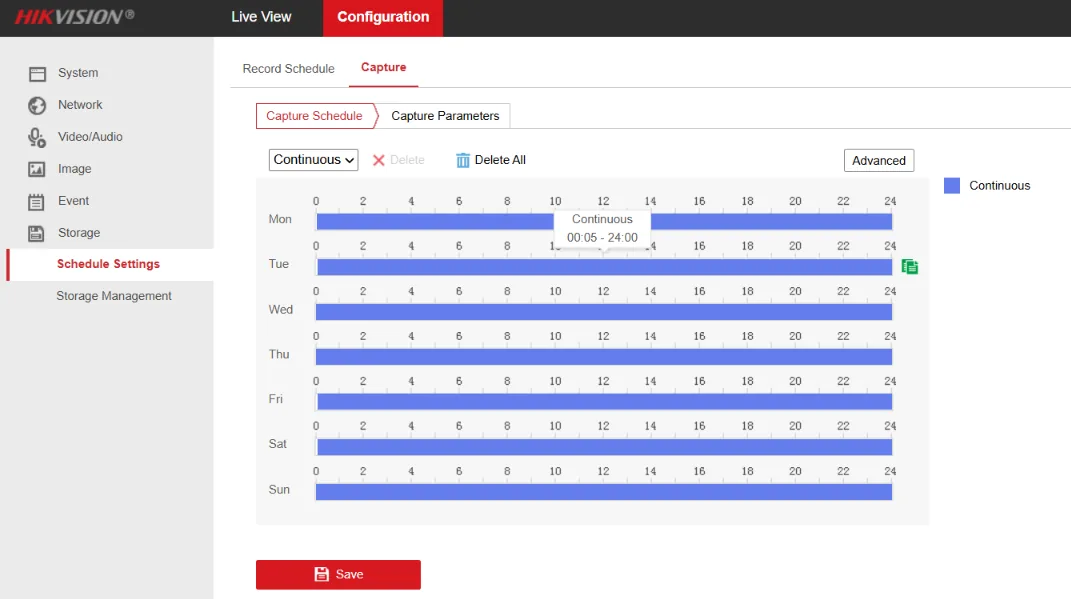
An empty capture schedule is the most common reason why nothing arrives although the FTP settings are correct – the camera simply does not take pictures. Check the blue bars, not just the "saved" message.
Interval: in the tested setup, 5 seconds and 1 minute ran flawlessly at full resolution. For a construction timelapse over months we recommend an interval of 5 to 10 minutes (300–600 seconds). We did not run that setting as a multi-day endurance test, so check the first installation after a few days.
5. Wait for the first image#
Back in TimelapseRobot, scroll to Step 2: Wait for first image to be uploaded and click Refresh until the first photo appears – at most one interval later. Step 3: Automatic Pattern Detection reads date and time from the filename; check that the values match the capture moment and pick your time zone if it shows *Unknown*. Then click Save Settings. Your camera is connected.
6. Prepare the microSD card for offline buffering#
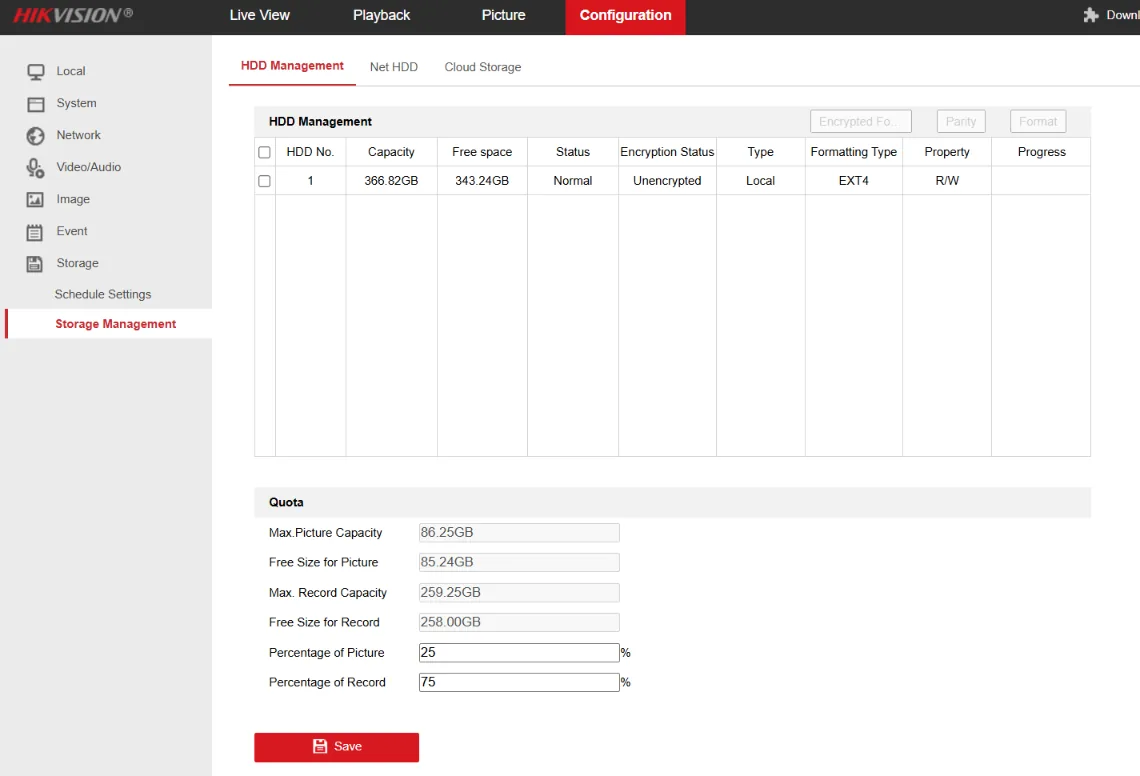
Under Configuration → Storage → Storage Management → HDD Management check that the card is recognised, formatted and *Read/Write*; initialise it there if needed. The Quota section splits the card between pictures and video – 25 % for pictures was far more than the buffering needed in the test.
Verified in testing: with the network cable pulled and the camera still powered, it kept capturing to the card; after reconnecting, it uploaded the backlog by itself, and every image landed at its original capture time, not the upload time. The same held after a full power cut of camera and gateway – the buffered images survived the restart and were uploaded afterwards. During a period without power, no images are taken, so a real gap remains; that is physics, not a fault. Outages of a few minutes were tested.
7. Remove the image overlays#
Out of the box the camera burns date, time and device name into every image – in a timelapse that flickers and cannot be removed later. Go to Configuration → Image → OSD Settings and untick *Camera Name*, *Display Date*, *Display Week* and *Text Overlay 1–4*. Only new images are affected, so do this before the first capture.
Five traps that stop images from arriving#
- The FTP Test button lies. It reported a write-permission warning while uploads worked. Only a scheduled image in TimelapseRobot counts.
- The `ftp.` subdomain is missing. Without it the field accepts the address, shows a green tick, and nothing arrives.
- Record Schedule instead of Capture. The first tab records video; only the second produces the stills.
- Empty capture schedule. FTP is right, nothing arrives – the camera is not taking pictures. Check the blue bars.
- Automatic Network Replenishment is off by default. Buffered images stay on the card and are never uploaded.
The full manual#
Everything above, plus commissioning from the factory reset, moving the camera onto the network, LTE operation with a Teltonika TRB140 gateway behind CGNAT, remote management via Teltonika RMS without open ports, a commissioning checklist and a site data sheet: Hikvision to TimelapseRobot – manual (PDF, 48 pages). Tested and written by Thomas Pöcksteiner, Filmspektakel, September 2026.
Why an FTP camera beats the built-in timelapse mode, and what TLR-Cloud does with the images: IP camera timelapse software and our guide on turning an IP camera into a construction timelapse system. If you have a Reolink camera instead, follow the Reolink setup guide.
Get started
Ready to capture your construction project in timelapse?
Get the complete weatherproof kit — or start free with your own FTP/IP camera.